Sunday, February 3, 2008

Wood At Last!


I finally got some wood, but it wasn't from the order I've been awaiting for two months. I ordered it from International Violin in Baltimore. It's a great company: good products, decent prices, and man are they fast! Usually I get shipments from them one or two days after I order them . Left to right: spruce for the top, maple for the sides, neck and back. The pieces for the top and the back are split down the middle so they will open like a book, giving mirror-image grain.
I had a setback with violin #1. I carefully fit the neck to the body a while back, then glued it up. But I only yesterday discovered that during the glueup (presumably) the neck shifted and is now at the wrong angle to the body. This after gluing on the back, installing the purfling, and trimming the edges! Now I have to take the neck off and reglue it at the correct angle. I guess I'll take the back off to make it easier. I put the label in the wrong spot anyway, so now I have an excuse to fix that also.
Anyway, this weekend I'll probably do the layout for the new form and cut it out if I have time.
Sunday, January 13, 2008

Plans


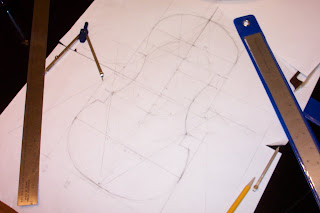
In the photograph is the layout for the new violin. Actually it's for the mold around which the violin is made. I used some instructions from Stradivari, but there were a few instructions missing and one typo, so I had to do a little editing and revising. I don't really like the way the center bout (the concave curve in the center on either side) blends into the points, so I may smooth that curve out a bit. It shouldn't make any difference in the sound because there are wood blocks that support the points, and that curve is on the outside of the block. Next I'll try to lay out the neck, but I have to learn to do a Spiral of Archimedes to get that right.

Sunday, January 6, 2008

Made some progress....

I made some progress over the last few days. I got the soundpost cut and fitted, and I also glued the back on the ribs, so now the box is complete: front, back, ribs, and neck. Still to do are the nut and the endrest, then it'll be time to do the purfling. For those of you who are new to this, the purfling is a long strip consisting of a thin sandwich of black and white veneer about 1/16" thick. A channel is cut around the edge of the face and the back of the violin, and the purfling is inlaid in it and trimmed flush. It's there partly for decoration, but mostly because it keeps the plates (face and back) from splitting. I hope to get started on that tomorrow.

Sunday, December 30, 2007

Diverted

Well, I *thought* I was going to precut the soundpost today, but when I picked up the back of the fiddle, I discovered that it was a bit lumpy on the inside. I thought that I'd finished that. So I scraped and sanded and tried to plane--for some reason my best violin plane was biting of chunks--and I scraped and sanded some more, but the lumps didn't want to go away. Finally I tried riffler files, and the problem was solved in just a few minutes. Unfortunately, I was too tired and frustrated to continue, so I quit for the night.

Saturday, December 29, 2007

The wood still hasn't shown up. I know these guys (ILS) are slow, but I'm starting to get a little worried. I mean, they did cash my check.

In the meanwhile, I glued the ribs to the belly of the other violin. I'm a bit concerned about the joint, since the ribs are made of three plys of birdseye maple veneer, and it's hard to get a smooth, flat edge to attach the belly to, but it seems to be okay. Then I fitted the neck to the body. I really took my time here, so it's a good fit. As it turned out, when I measured the height of the fingerboard from the belly, it was 2 cm on the first try! I must be doing something right! I glued the neck on last night, and this morning it was solid as a rock, so I trimmed off the excess of the neck, making it even with the end block.

I've decided that I need a better layout process, because I found that when I fit the back to the ribs, there's a gap between the rib at the centerbout and the back. The rib curves in too far. I think if I had a way to keep the rib-and-corner-blocks assembly from changing shape while I model the back and the belly, the plates would match up better when I get to this point. Maybe if I just change the order of doing things and lay out the back and belly at the same time by tracing around the ribs, I'd get a better fit. Anyway, I inlaid a piece of wood left over from cutting out the back and shaped it so that the rib came down on it perfectly, leveled it, and it'll be fine, although the joint may be visible on close inspection.

I'll probably pre-cut the soundpost later tonight.

Sunday, December 16, 2007

Bass Bar and F Holes

In the last couple of days I finished the bass bar and started cutting out the F-holes. The interesting part is that I went with my wife to a music store and just sat out back with my travelling kit and got ready to lay out the F-holes. But when I opened the kit, the F-hole template was missing. "Great," I thought, "Now what am I going to do for the next hour while she shops?" Then I remembered that the music store has some fine violins on display, so I decided to go in and draw the F-holes freehand, using one of their violins as a model. As I was doing that, one of the employees came over and seeing what I was up to, he had a better idea. We took a violin out of the case (100 years old, but I can't remember who made it) and used a pencil and paper to do a "tomb rubbing" of one of the F-holes. That didn't work too well, but we hit upon the idea of placing cellophane tape over the hole and rubbing the pattern onto that. It worked just fine, but we incurred the wrath of another staff member who was afraid that we might damage the finish with the tape. Fortunately, we did no damage, and I cut out the pattern from a xerox of the rubbing, laid out the F-holes and started cutting. I'm almost finished, but it's bedtime.

Manana, y'all.

Patrick

Sunday, December 9, 2007

Hello World!

Hello Everybody,

I'm starting this blog to document the building of a violin. It's actually my third violin (second made from scratch). As soon as the next batch of wood arrives, I'll start posting pictures and descriptions of what I'm doing. You get to be present at the creation, in on the workings--inner and outer--and the finished product will be for sale at the end. How's that sound?

My fellow luthiers are welcome to chime in with suggestions, which of course I may ignore or honor.

In my next post I'll try to let you in on some of what I've done so far.

Patrick Callanan