Hi, Everyone.
The fiddle has been put on hold for a while, because I'm trying to solve a cash flow problem by taking in a lot of short-term piano repair work. I'm guessing that the problem will be over with by mid-August.
Monday, July 14, 2008
Tuesday, March 25, 2008
Cutting corners
Farther along
Sunday, February 3, 2008
Wood At Last!


I finally got some wood, but it wasn't from the order I've been awaiting for two months. I ordered it from International Violin in Baltimore. It's a great company: good products, decent prices, and man are they fast! Usually I get shipments from them one or two days after I order them . Left to right: spruce for the top, maple for the sides, neck and back. The pieces for the top and the back are split down the middle so they will open like a book, giving mirror-image grain.
I had a setback with violin #1. I carefully fit the neck to the body a while back, then glued it up. But I only yesterday discovered that during the glueup (presumably) the neck shifted and is now at the wrong angle to the body. This after gluing on the back, installing the purfling, and trimming the edges! Now I have to take the neck off and reglue it at the correct angle. I guess I'll take the back off to make it easier. I put the label in the wrong spot anyway, so now I have an excuse to fix that also.
Anyway, this weekend I'll probably do the layout for the new form and cut it out if I have time.
Sunday, January 13, 2008
Plans

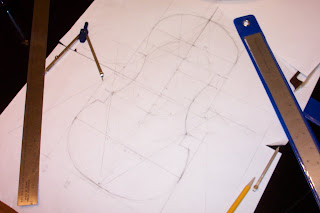
In the photograph is the layout for the new violin. Actually it's for the mold around which the violin is made. I used some instructions from Stradivari, but there were a few instructions missing and one typo, so I had to do a little editing and revising. I don't really like the way the center bout (the concave curve in the center on either side) blends into the points, so I may smooth that curve out a bit. It shouldn't make any difference in the sound because there are wood blocks that support the points, and that curve is on the outside of the block. Next I'll try to lay out the neck, but I have to learn to do a Spiral of Archimedes to get that right.
Sunday, January 6, 2008
Made some progress....
I made some progress over the last few days. I got the soundpost cut and fitted, and I also glued the back on the ribs, so now the box is complete: front, back, ribs, and neck. Still to do are the nut and the endrest, then it'll be time to do the purfling. For those of you who are new to this, the purfling is a long strip consisting of a thin sandwich of black and white veneer about 1/16" thick. A channel is cut around the edge of the face and the back of the violin, and the purfling is inlaid in it and trimmed flush. It's there partly for decoration, but mostly because it keeps the plates (face and back) from splitting. I hope to get started on that tomorrow.
Subscribe to:
Comments (Atom)


